The kit mixes science with scented fun and would make a great activity for a sleepover or party! The set is aimed at ages 8 and over but younger children can enjoy it with adult assistance.
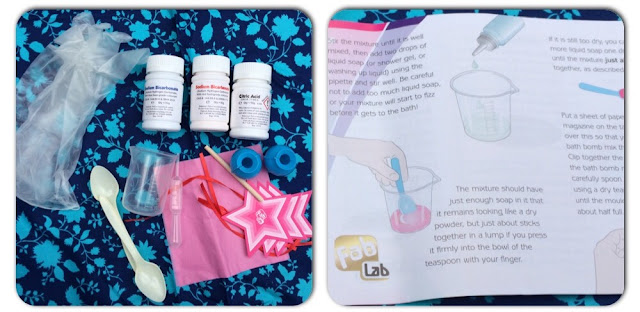
Inside the box you get:
• 1 Pot of Sodium Bicarbonate (Blue)
• 1 Pot of Sodium Bicarbonate (Pink)
• 1 Pot of Citric Acid
• 2 Bath Bomb Moulds
• 2 Plastic Spoons
• 1 Measuring Beaker
• 1 Pair of PVC Lab Gloves
• 5 Sheets of Pink Tissue Paper
• 5 Lengths of Red Ribbon
• 12 Page Instruction Booklet
• 1 Pipette
• 5 Gift Tags
A small amount of liquid soap or shower gel is also required and not provided in the kit and you can add a scent with a drop of perfume too.
The full colour instructions had both pictures and text and were easy for Ben to follow without much involvement from me. Although the chemicals in the set were not harmful to skin I was pleased that the gloves were provided for Ben to use to prevent any irritation.
We started off by measuring the Sodium Bicarbonate and Citric Acid out and then mixing them together then using the pipette added tiny drops of shower gel before mixing again. Both children really enjoyed this part, they were excited by the change in consistency when the ingredients were mixed together.
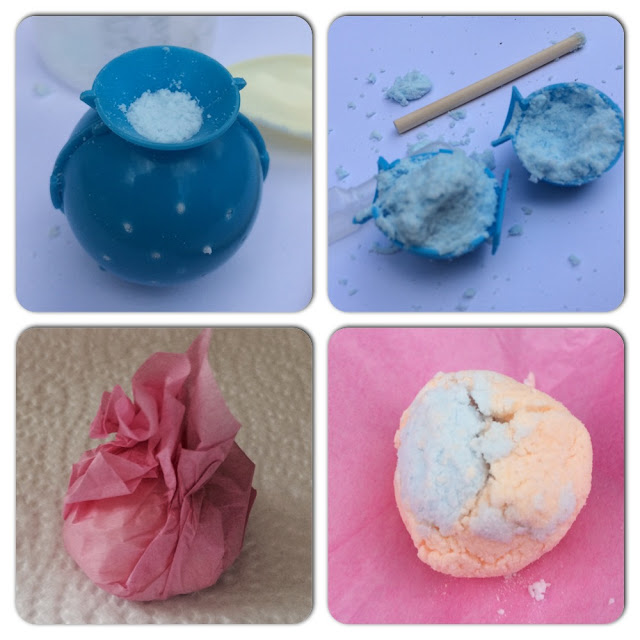
Once the mixture was as described in the instructions, Ben started to spoon it in to the plastic mould and pack it down to create the round bath bomb shape.
This is where things started to differ from how they were described, at first our powder seemed to dry and crumble as soon as the mould was opened, next time we tried adding sightly more liquid as listed in the 'tips' section of the instructions but then it started to fizz in the mould. It took a few attempts but eventually we were able to get a couple of round shaped bathbombs that looked great! We left them to dry on the windowsill for a day and they hardened and became much easier to handle and wrap in the pretty pink tissue paper.
The Sodium Bicarbonate comes in two colours, so you can make pink or blue bath bombs or mix them together to create a marbled effect.We did this and they looked really effective.
Ben who is 8 this month, thoroughly enjoyed the whole experience, he loves discovering how things work and was asking lots of questions about the reaction between the ingredients and why they fizz up in water. He even used the supplied tissue paper and ribbon to wrap a couple up to give as a thank you gift to Nanna for taking him out for the day.
Elizabeth who is much younger did get frustrated when things didn't go to plan the first time and got a little bored with the whole process but she is a lot younger than the suggested age so that isn't surprising. I can see this activity being something she would absolutely love in a few years time.
We contacted Interplay mentioning the fact we'd had issues with our first few attempts and they came back with these helpful tips:
Although not all the bathbombs we made went entirely right, they all smelt delicious and were fun to try out in the bath! We have a small amount of ingredients left and Ben wants to use them to make a special gift for Gran's birthday.
Although the colours of the packaging seem to market this at girls, I would recommend this set for both boys and girls age 8 and above as a great activity to get them thinking about the way different chemicals react with each other while also having fun! They also make ideal home-made gifts from children for friends and family!
With pretty much everything you need to make 12 bath bombs and clear, easy to follow instructions I believe this set is great value at an RRP of £12.99 and would make a great gift.
If you want to try making your own bathbombs then we have just the giveaway for you! The lovely folks at Interplay have given me a FabLab Bathbomb Making Kit to giveaway to one of my readers!
Just follow the rafflecopter instructions below for your chance to win...
Good Luck!
a Rafflecopter giveaway
The full colour instructions had both pictures and text and were easy for Ben to follow without much involvement from me. Although the chemicals in the set were not harmful to skin I was pleased that the gloves were provided for Ben to use to prevent any irritation.
We started off by measuring the Sodium Bicarbonate and Citric Acid out and then mixing them together then using the pipette added tiny drops of shower gel before mixing again. Both children really enjoyed this part, they were excited by the change in consistency when the ingredients were mixed together.
Once the mixture was as described in the instructions, Ben started to spoon it in to the plastic mould and pack it down to create the round bath bomb shape.
This is where things started to differ from how they were described, at first our powder seemed to dry and crumble as soon as the mould was opened, next time we tried adding sightly more liquid as listed in the 'tips' section of the instructions but then it started to fizz in the mould. It took a few attempts but eventually we were able to get a couple of round shaped bathbombs that looked great! We left them to dry on the windowsill for a day and they hardened and became much easier to handle and wrap in the pretty pink tissue paper.
The Sodium Bicarbonate comes in two colours, so you can make pink or blue bath bombs or mix them together to create a marbled effect.We did this and they looked really effective.
Ben who is 8 this month, thoroughly enjoyed the whole experience, he loves discovering how things work and was asking lots of questions about the reaction between the ingredients and why they fizz up in water. He even used the supplied tissue paper and ribbon to wrap a couple up to give as a thank you gift to Nanna for taking him out for the day.
Elizabeth who is much younger did get frustrated when things didn't go to plan the first time and got a little bored with the whole process but she is a lot younger than the suggested age so that isn't surprising. I can see this activity being something she would absolutely love in a few years time.
We contacted Interplay mentioning the fact we'd had issues with our first few attempts and they came back with these helpful tips:
- Use some oil to lightly grease the inside of the mould before starting to add the mixture in.
- Leave the filled mould in a warm dry place such as a windowsill for around 30 minutes before attempting to open it.
Although not all the bathbombs we made went entirely right, they all smelt delicious and were fun to try out in the bath! We have a small amount of ingredients left and Ben wants to use them to make a special gift for Gran's birthday.
Although the colours of the packaging seem to market this at girls, I would recommend this set for both boys and girls age 8 and above as a great activity to get them thinking about the way different chemicals react with each other while also having fun! They also make ideal home-made gifts from children for friends and family!
With pretty much everything you need to make 12 bath bombs and clear, easy to follow instructions I believe this set is great value at an RRP of £12.99
If you want to try making your own bathbombs then we have just the giveaway for you! The lovely folks at Interplay have given me a FabLab Bathbomb Making Kit to giveaway to one of my readers!
Just follow the rafflecopter instructions below for your chance to win...
Good Luck!
a Rafflecopter giveaway


